
The editor
Editor is the place where you can view and modify captured images, view recorded videos and apply AI features.
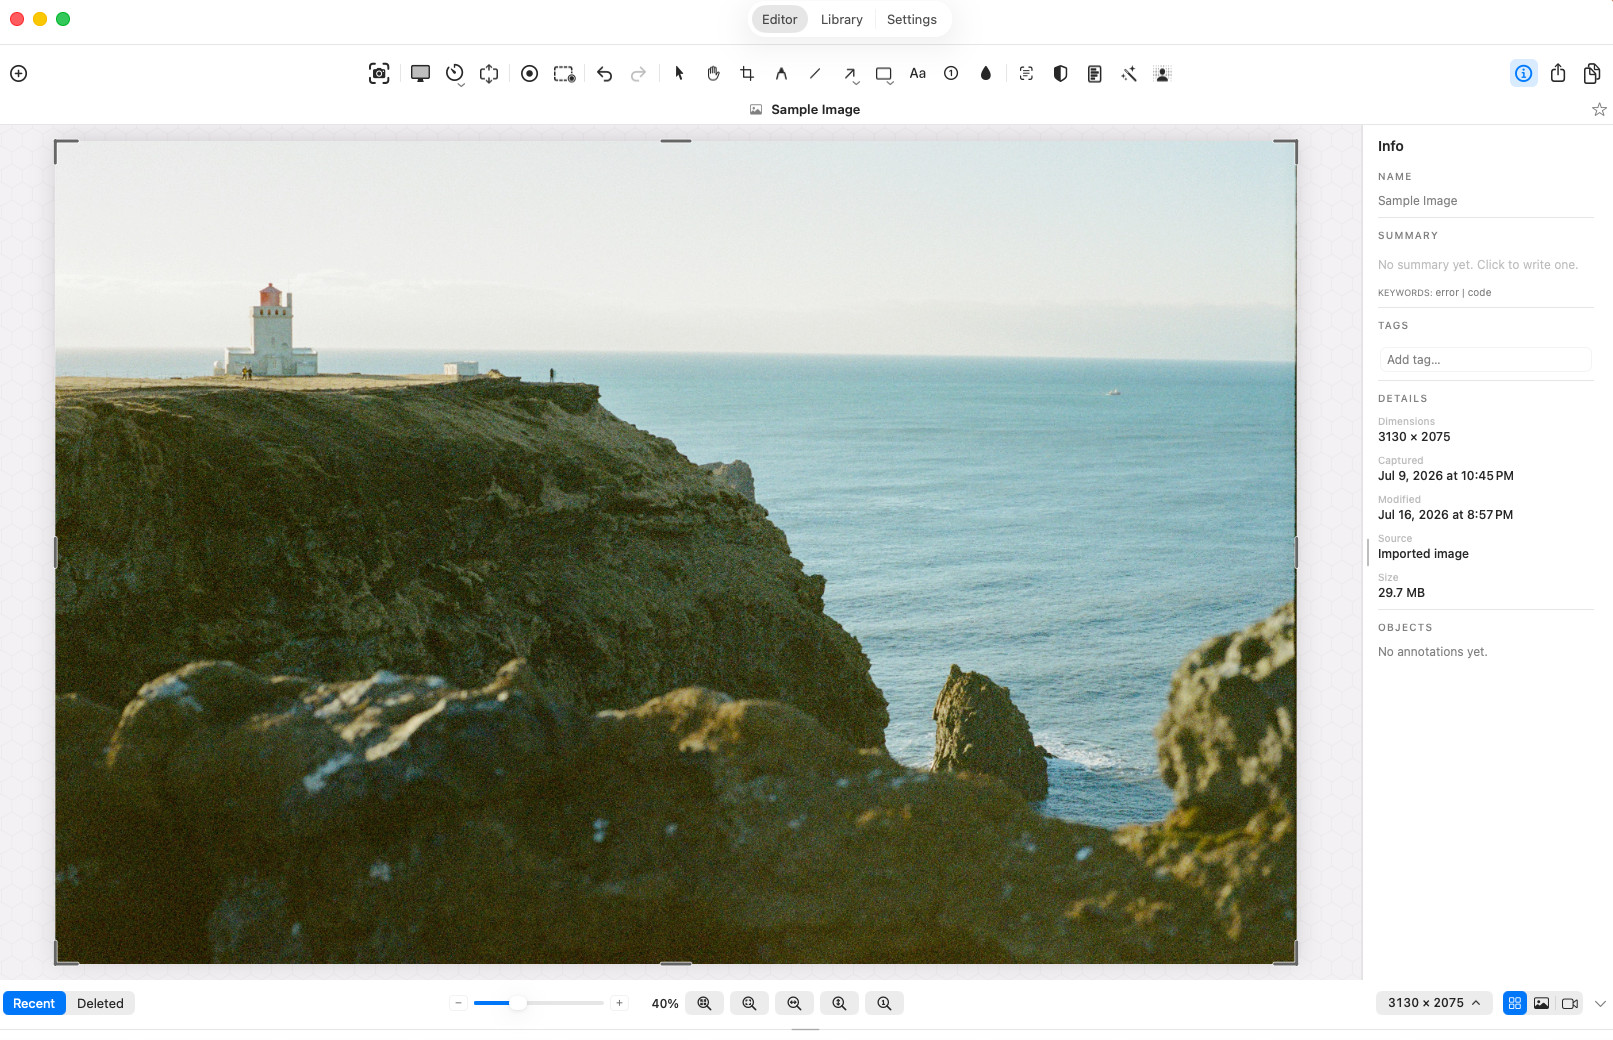 The editor: toolbar, canvas, Info panel, and the recent-captures strip.
Annotation tools
Section titled “Annotation tools”Pick a tool from the toolbar, then draw on the canvas. Left to right:
- Select — select, move, and transform objects.
- Hand — pan around a zoomed canvas.
- Crop — see Crop and resize below.
- Pen — smoothed freehand strokes.
- Line.
- Arrow — one grouped pill holding Line Arrow (straight) and Free Arrow (drawn by hand), with adjustable end-caps and solid/dashed/dotted styles. The Shaft control switches between Tapered — widest at the head, narrowing to the tail, so it reads as a stroke of the pen rather than a drawn shape — and Uniform. Tapered is the default for new arrows; a double-headed arrow tapers from wide to narrow across its length, dashed arrows taper too, and a free arrow stays an even width. The control is in the arrow tool’s settings and on the panel for an arrow you have already selected.
- Shapes — one grouped pill holding Rectangle and Ellipse.
- Text — click to type; a full font picker with rich styling, a weight slider, and per-word colour and size. Typography is remembered per tool.
- Step — auto-incrementing numbered badges.
- Blur — see below.
Each tool has its own colour, opacity, and stroke controls in the properties panel — and each remembers its last-used style.
An Outline colour chip adds a contrasting casing around pen, line, arrow, shape, step, and text annotations (with its own width control) so marks stay readable on any background.
Annotations can carry a drop shadow (toggle it on, then aim it with the position pad or the eight direction presets). Annotations live on their own layer above the image, reorderable (send forward / send backward) from the properties panel.
Annotations don’t have to stay inside the screenshot. Draw an arrow, line, shape, pen stroke, text box, or blur past the edge and the canvas grows to make room when you finish, so marks that point at the image from outside stay where you put them. A single undo reverts both the annotation and the growth.
 Each tool carries its own colour, width, and style options.
Move, resize, rotate, flip
Section titled “Move, resize, rotate, flip”Select an object to get resize handles plus a rotate handle. Drag to rotate (hold to snap to common angles), or use the properties panel / right-click menu to set an exact angle or flip horizontally / vertically. Paste keeps an object’s transform.
To select several objects at once, drag a selection box across the canvas — starting from empty canvas or from the margin around the image — and it selects the objects it fully encloses.
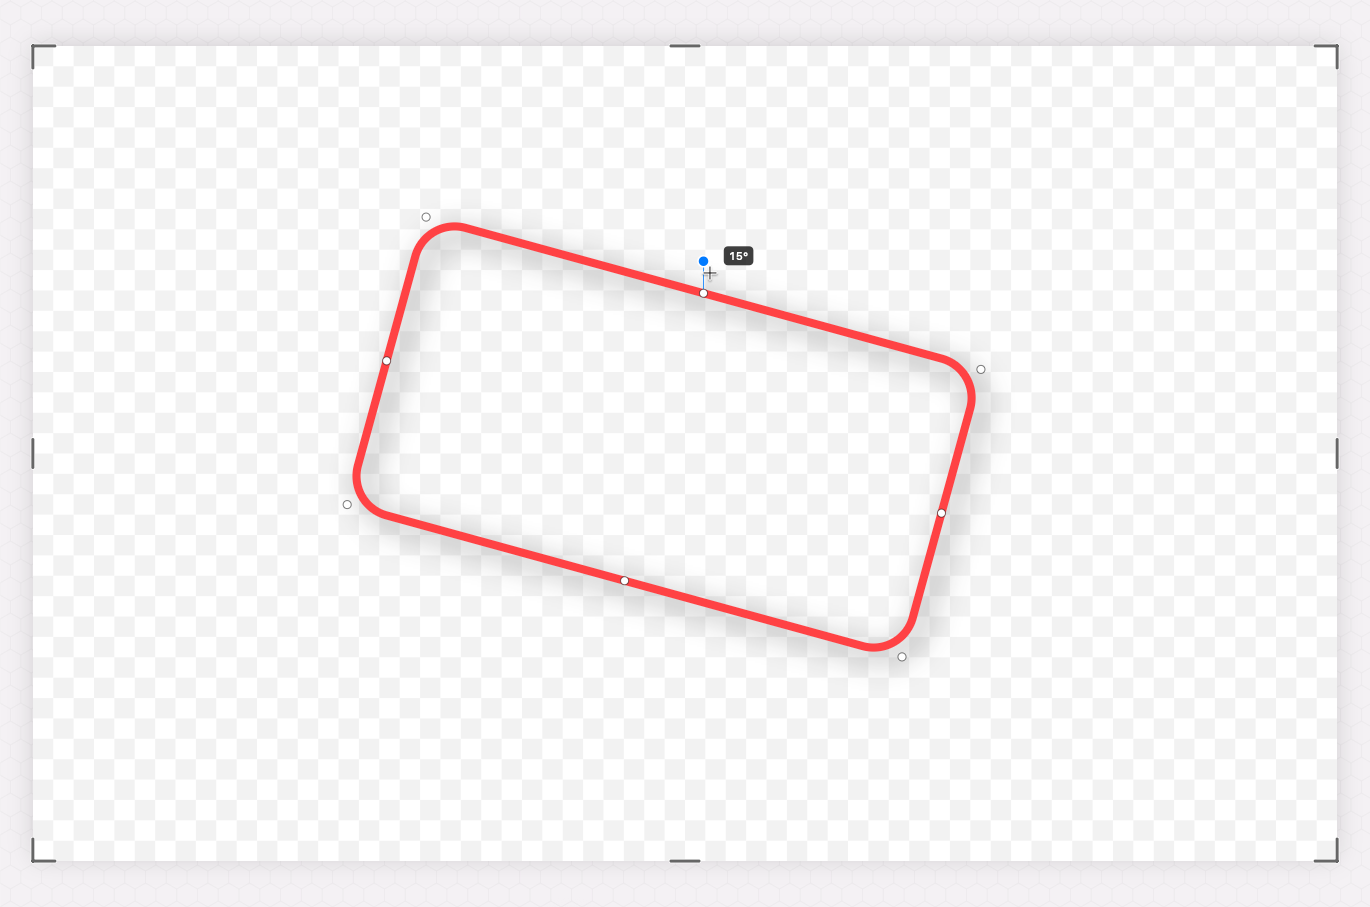 Resize from the handles; rotate from the top handle.
Blur and redaction
Section titled “Blur and redaction”Select the Blur tool to hide sensitive content. Choose between:
-
Gaussian blur — softens the region while hinting at what’s there.
-
Solid fill — paints over the region so the content underneath is unrecoverable in an exported image. Use this for anything truly sensitive.
Solid fill is an annotation, not a change to the pixels: a
.sealpackage keeps the original capture so your edits stay reversible. Export a flattened image — PNG or JPEG — when you send something out, rather than the editable package.
Blur regions can be a rectangle, ellipse, or a freehand brush. A strength slider controls the intensity (it’s labelled Opacity for Solid fill), and for the brush a width control sizes the stroke.
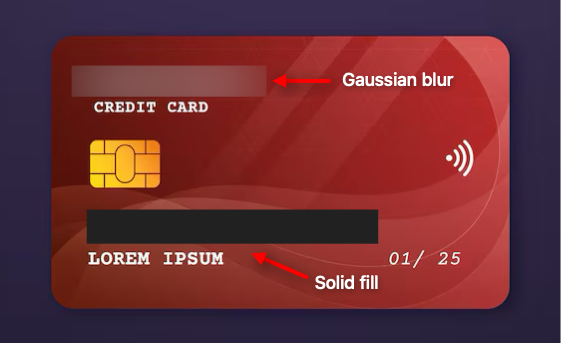 Gaussian blur hints at what’s there; Solid fill leaves nothing to recover once the image is exported.
Focus area
Section titled “Focus area”The focus area adds another layer on top of the captured image. It helps to provide finer level control on the image. By default, it covers the entire image. Drag the viewfinder brackets at the image’s corners and edges inward to adjust its size. Note that it’s non-destructive: the document doesn’t change, and the brackets stay adjustable.
- Exports honor it. Export to Image and dragging a capture out of the recent strip produce just the focus area — a crop that exists only in the export, reversible any time by moving the brackets back out.
- The Focus button in the zoom cluster zooms straight to it.
- Right mouse button pans the image around the adjusted focus area. Note panning works on the image, not the focus brackets
- Find in Image can limit its search to it.
- The right-click menu can make it permanent with Crop to Focus Area, or clear it with Reset Focus Area.
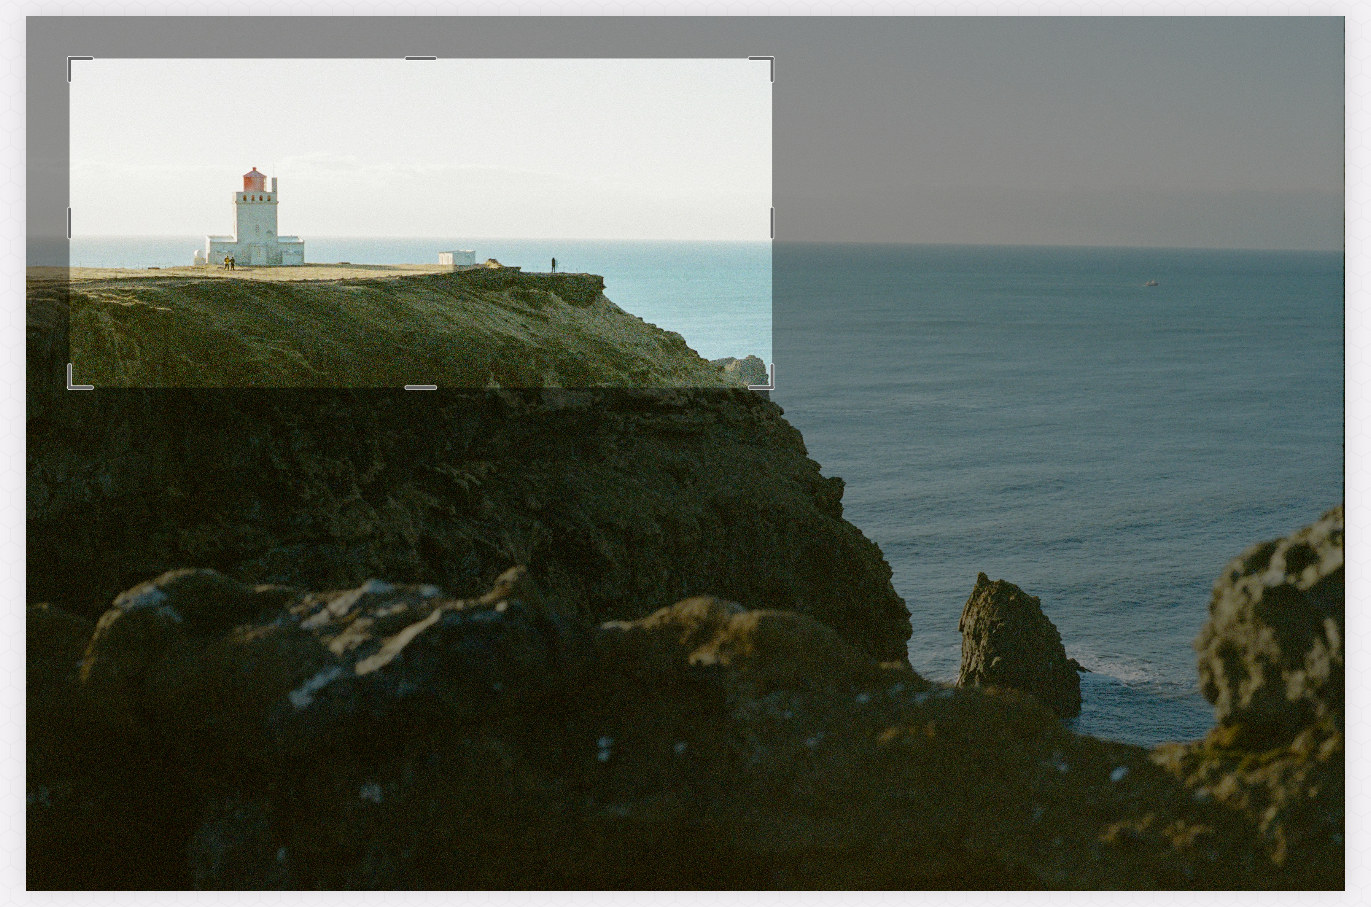 Drag the brackets inward to set a focus area.
Crop and resize
Section titled “Crop and resize”- Crop — pick the Crop tool and drag a region. Adjust it (with an aspect-ratio lock when you need exact proportions), then press Return to crop or Esc to abandon — the on-canvas hint spells it out. Cropping trims the document and clips annotations to the new bounds.
- Cut, copy, or lift a region — while a crop selection is pending, ⌘C copies the region, ⌘X cuts it out leaving a transparent hole, and ⌘↩ lifts it out as its own movable object over the hole — one undo step reverts both.
- Resize — set exact document dimensions from the Resize popover, with units and a ratio lock.
- Revert to Original Image returns to the untouched capture at any time.
Insert images
Section titled “Insert images”Add another image on top of your capture — a logo, a second screenshot — via File → Insert Image on Canvas… (⇧⌘I), or just drop a file onto the canvas. Inserted images move, resize, and rotate like any other object.
Dropping works on a canvas that already holds a capture, not only an empty one, and the image arrives as an overlay wherever you drop it. Drag from the recent strip, the Library, or the Finder.
Pasting follows the same rule with one difference: paste into an empty canvas and the canvas takes the image’s own size at full resolution, the same as File → New from Clipboard, rather than shrinking it into the default 800 × 500. Paste onto a capture and it arrives as a movable overlay.
Start from a blank canvas
Section titled “Start from a blank canvas”The editor doesn’t need a capture to start from:
- File → New Canvas (⌘N) opens an empty canvas to annotate on.
- File → New from Clipboard (⇧⌘N) turns an image on your clipboard into a canvas — available whenever the clipboard holds one.
- File → Import to Library… (⌘O) brings existing image files into your library.
The + button on the toolbar offers the same three actions.
Live Capture scenes
Section titled “Live Capture scenes”A Live Capture opens as a layered scene: each captured window is its own image object, stacked over the desktop wallpaper. Because every window was captured in full, you can rebuild the desktop however you like:
- Raise a buried window — select it and bring it forward; its whole contents are there, even the parts that were hidden.
- Rearrange and remove — drag windows around, resize them, send them forward or back, or delete the ones you don’t need.
- Auto Arrange — with two or more windows, tidy them into a neat, non-overlapping layout in one step.
- Export This Window… — right-click a selected window to save just that window as its own PNG.
- Revert to Original Image puts every window back where it was captured.
Annotate over the whole scene with any tool, then Export to Image (⌘S) to flatten the wallpaper, windows, and annotations into one picture — just like any other capture.
A narrow window
Section titled “A narrow window”The editor no longer stops resizing while still nearly a thousand points wide. Drag it narrow and related buttons tuck themselves into small menus instead — the capture modes gather under Capture, the two recording buttons pair up, the AI actions share one button, and the drawing tools group the way Arrow and Shape already do. The zoom controls along the bottom do the same. Nothing is taken away: everything is one click further, and it all comes back as you widen the window, so the editor works at little more than half its old minimum width — useful beside the app you are documenting.
Zoom and navigation
Section titled “Zoom and navigation”- ⌘-scroll zooms toward the cursor from any tool; ⌘+ / ⌘− / ⌘0 zoom in, out, and back to actual size — or type an exact percentage in the zoom field.
- Fit, Fit width, Fit height, and Actual size are one click away in the zoom cluster, and the Focus button zooms straight to the focus area if you’ve set one.
- Right-drag pans a zoomed image from any tool (a plain right-click still opens the context menu); the Hand tool pans too.
The Info panel
Section titled “The Info panel”The Info panel on the right shows the capture’s name, dimensions, and its automatic summary and Smart Keywords, plus your own tags and a favorite star — all editable in place. See On-device AI for how the summary and keywords are generated.
The recent strip
Section titled “The recent strip”A recent-captures strip runs along the bottom of the editor so your latest shots are one click away. Click a thumbnail to open it, right-click for actions, or drag a thumbnail out to Finder, Mail, or any app. Videos show a play badge — click it to play, or click the thumbnail to open paused.
Dragging a capture somewhere the Sealshot window is covering? Hold ⌃ (control) while you drag and the window gets out of your way so you can see the drop target; let go and it comes straight back. The drag shows the reminder while you are holding the file.
 Jump between recent captures without leaving the editor.
Right-click on the canvas
Section titled “Right-click on the canvas”Right-click an object for Cut, Copy, Paste and Duplicate alongside the arrange, flip and delete actions. ⌘D duplicates the selection directly, dropping the copy slightly below and to the right, and it leaves your clipboard alone. The same actions are in the Edit menu.
Right-click an empty part of the canvas for Export to Image, Export to Package… and — for a recording — Export to Video…, next to Show in Finder and Show in Library. It is the same set the recent strip offers, so you can export the capture you are editing without leaving it.
Undo that survives relaunch
Section titled “Undo that survives relaunch”The editor’s undo history is persistent: quit and relaunch, switch between captures, and you can still step backwards (⌘Z) and forwards (⇧⌘Z). It’s a single app-wide timeline covering everything — annotations, resize, enhance, background removal, metadata edits, recordings, and deleting and restoring captures — and each undo shows a brief label naming what it undid, on which item.
Export
Section titled “Export”When you need a regular image, File → Export to Image (⌘S) writes a
flattened PNG; the Copy button puts the flattened image on the
clipboard. The editable .seal original stays intact, so you can always
re-export later — and for encrypted sharing or video export, see
Sharing & export.